
 52
52
DocuSign Sender Quick Reference Guide (QRG)
*NOTE: All Legal Assistants get Docusign - must be added to Docusign group. Attorneys can get by request.**
To Access DocuSign:
• Navigate to Roetzel Bookmarks in your browser. Enter your email address and click Next. A password is not necessary, as authentication will use Single Sign-On (SSO).
1. Start and Send an Envelope
Navigate:
From the Home page, select:
Start > Envelope > Send an Envelope
Upload Files:
In the Prepare view, drag and drop your files, or select Upload to browse to the locally saved files.
Add Recipients:
Enter the name and email address of your first recipient. To add multiple recipients, click the Add recipient and add next recipient information.
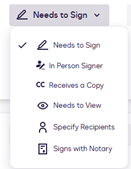
Set Recipient Action from the Dropdown:
Set Signing Order (if multiple recipients):
Control the order in which recipients receive and sign documents.
2. Add Message and Envelope Details
Subject & Message:
Enter a clear subject line (serves as both subject and envelope title).
For repeated documents, use a custom subject line to distinguish envelopes.
Note: Default subject lines make it hard to identify individual envelopes.
Envelope Type:
Select from the dropdown list. Chose Other and enter Engagement Letter under the dropdown for Envelope Types.
Frequency of Reminders:
Select from the dropdown list.
3. Add Signing Fields
Once files, recipients, and messages are set:
Add fields for each signer (signature, initials, other info).
Select a recipient from the list at the top.
Drag and drop fields into the document.
4. Final Steps
Preview:
Click Preview to see what the recipient will see.
Close the preview.
Send:
Click Send to deliver the envelope.
Once signee signs the document, you will receive confirmation.
Tip: A clear subject line helps identify envelopes, especially when sending similar documents repeatedly.
Executed engagement letters must be saved to iManage.

